Camera Calibration
Calibrating a camera will synchronize their shutters during effects.
Why calibrate?
Calibration allows you to simply and easily sync cameras of different make a models. It also allows you to easily adjust the timing of groups of cameras with a single value change. Combined with the effect builder, calibration is the easiest way to simplify your timing and event calculations. In most cases, after calibrating your cameras, most are able to use the default effect with no additional changes.
Requirements
- WOLFONE node
- Windows/Mac computer running Leash app
- Compatible camera shutter release cable
- Compatible camera PC sync cable (flash)
Warnings ⚠️
- It is recommended to use the exact flash trigger hardware you intend to use. If you plan to use pocket wizards to trigger your flash, use pocket wizards for calibration.
- In some cases, powering the node, camera, and strobe from separate sources can cause compatibility issues. In this case, reduce the number of cables or change power sources. Further isolation of the the signal using wireless adapters can resolve the issue.
- Changes to the camera, flash, or other devices may change the timing. In this case, re-calibrate the camera.
Performing a camera calibration
-
Connect node to Mac/PC
-
Open Leash app
-
Navigate to the Calibration tab

-
Connect the camera shutter release to any port on the node.
-
Connect the PC sync output to the node input port (pink color). The port led indicator should turn white, this is normal. If the port turns green, reconnect the cable.

Wired connection to perform camera calibration

Calibration will run on ANY node connected via HowlNET connections
- Press CALIBRATE in Leash
-
Leash will automatically search for the camera
-
Once the camera is found, Leash will perform a calibration routine.
-
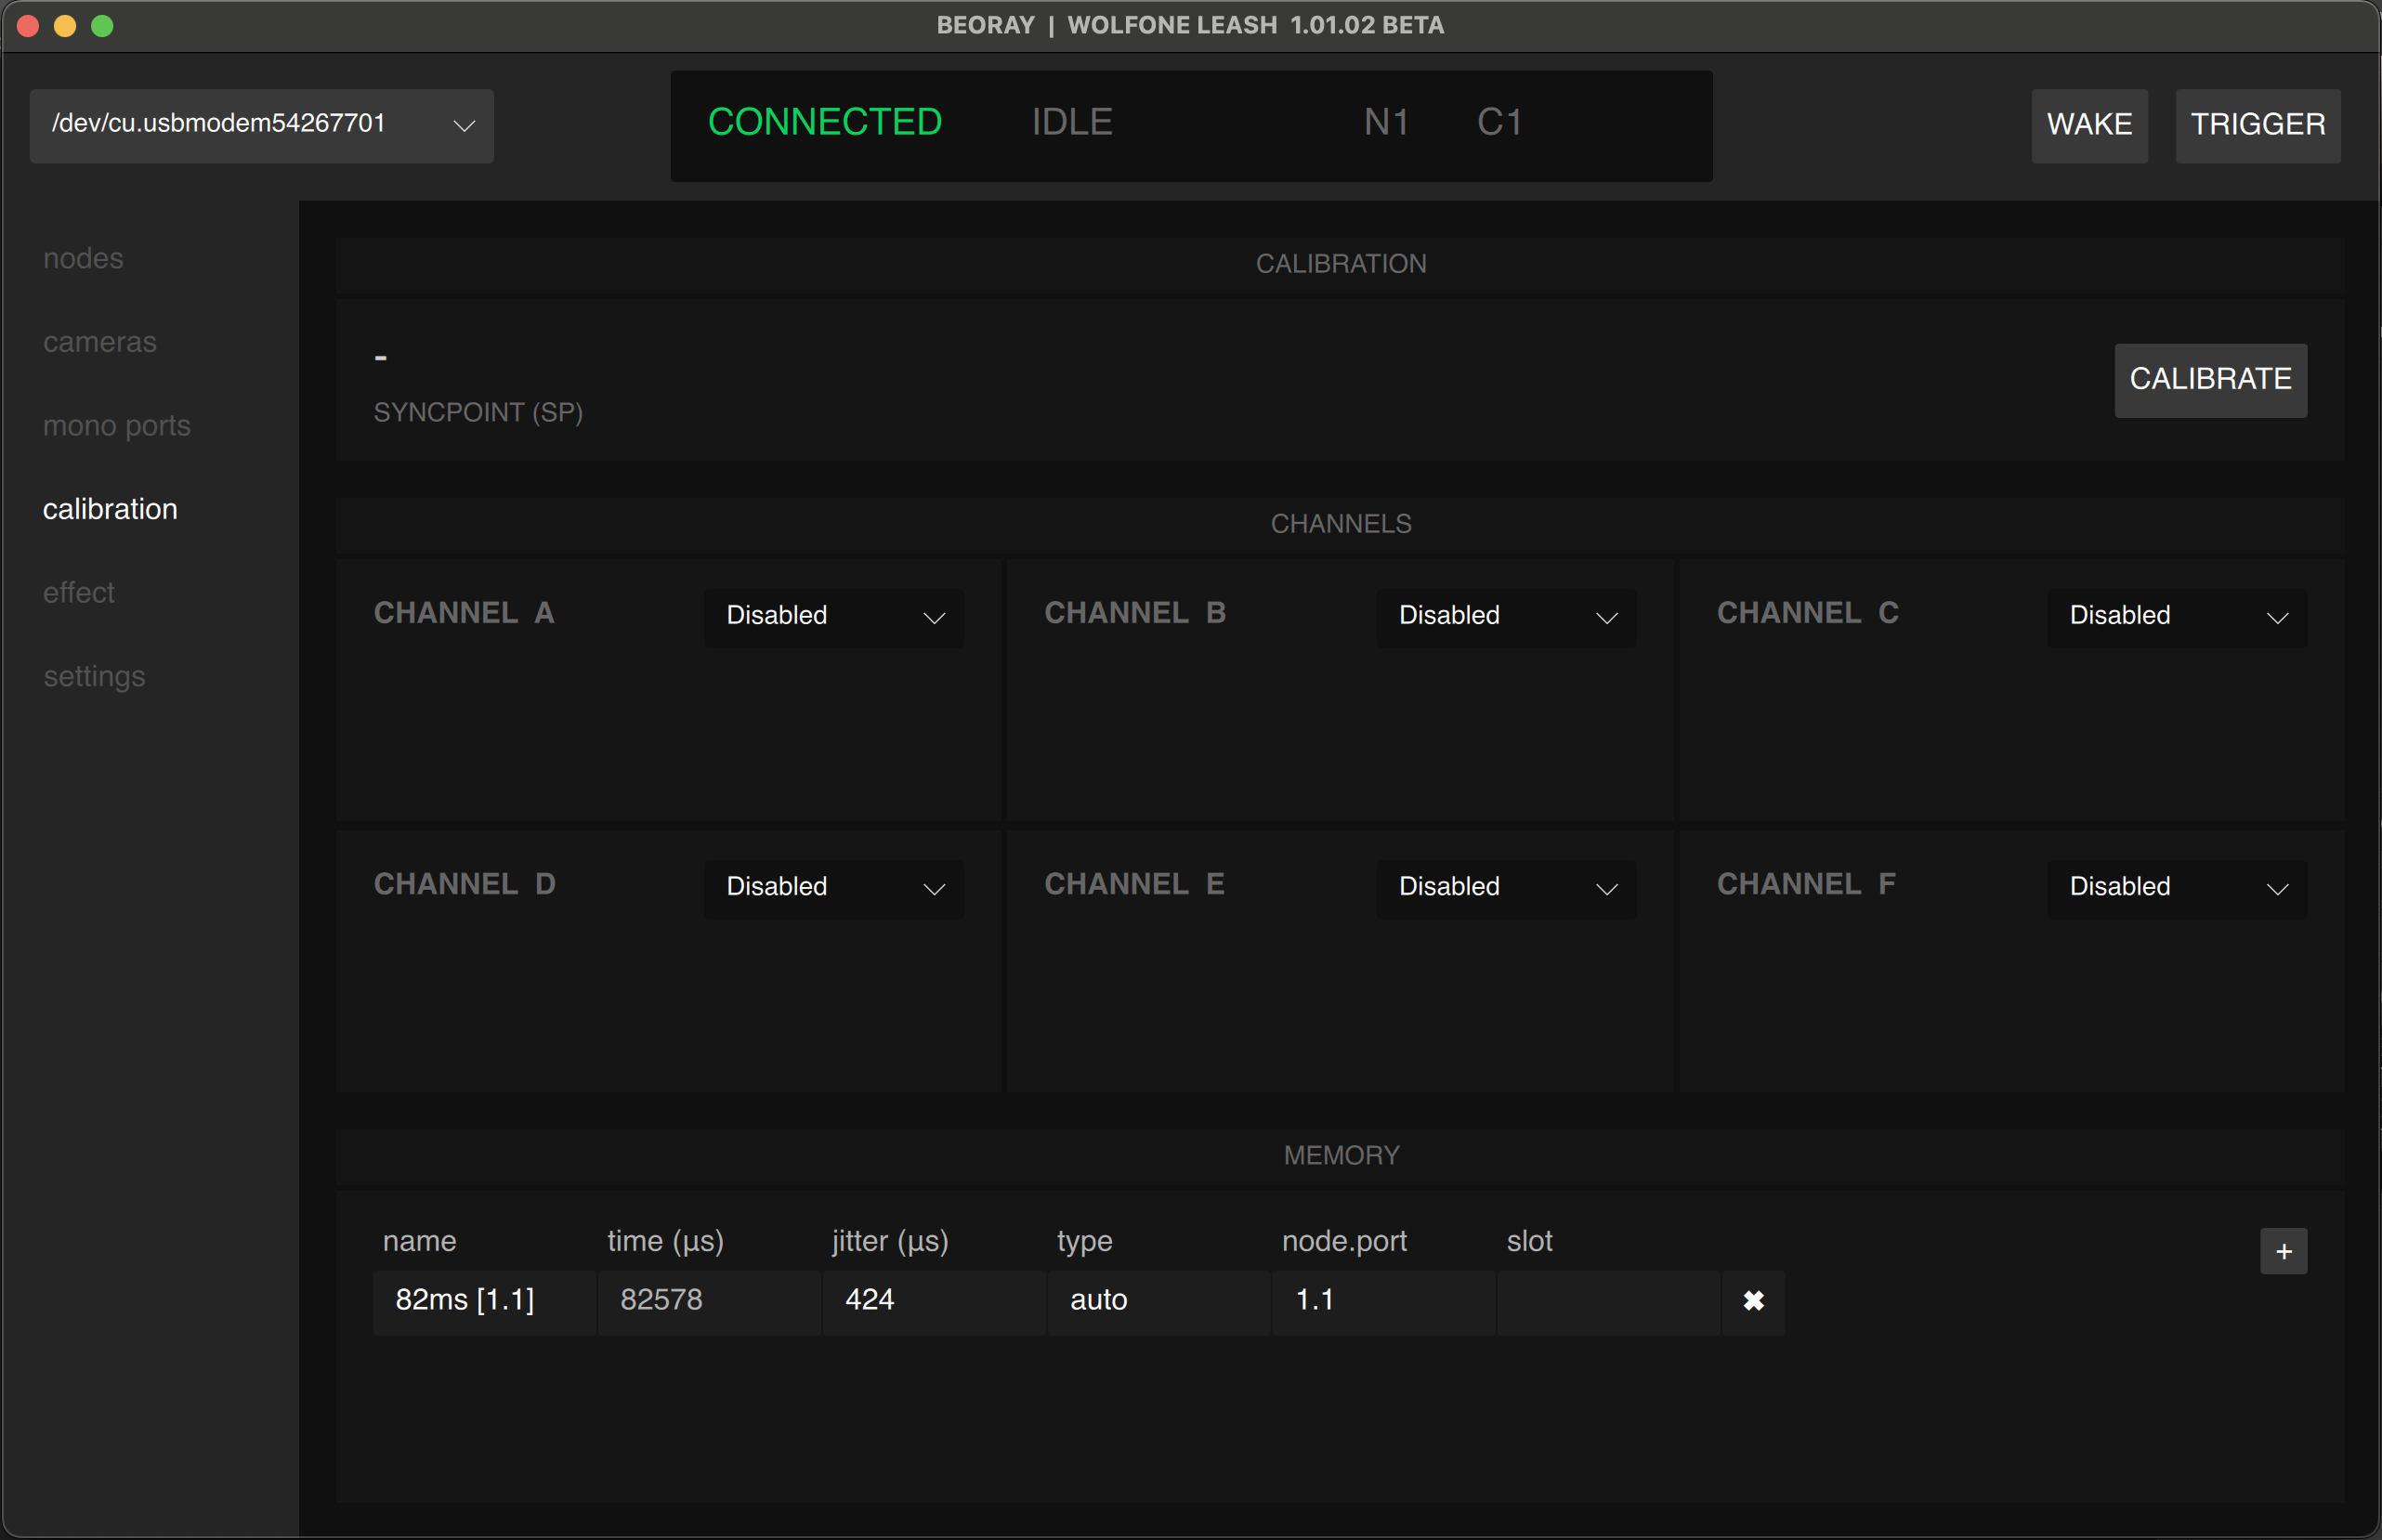
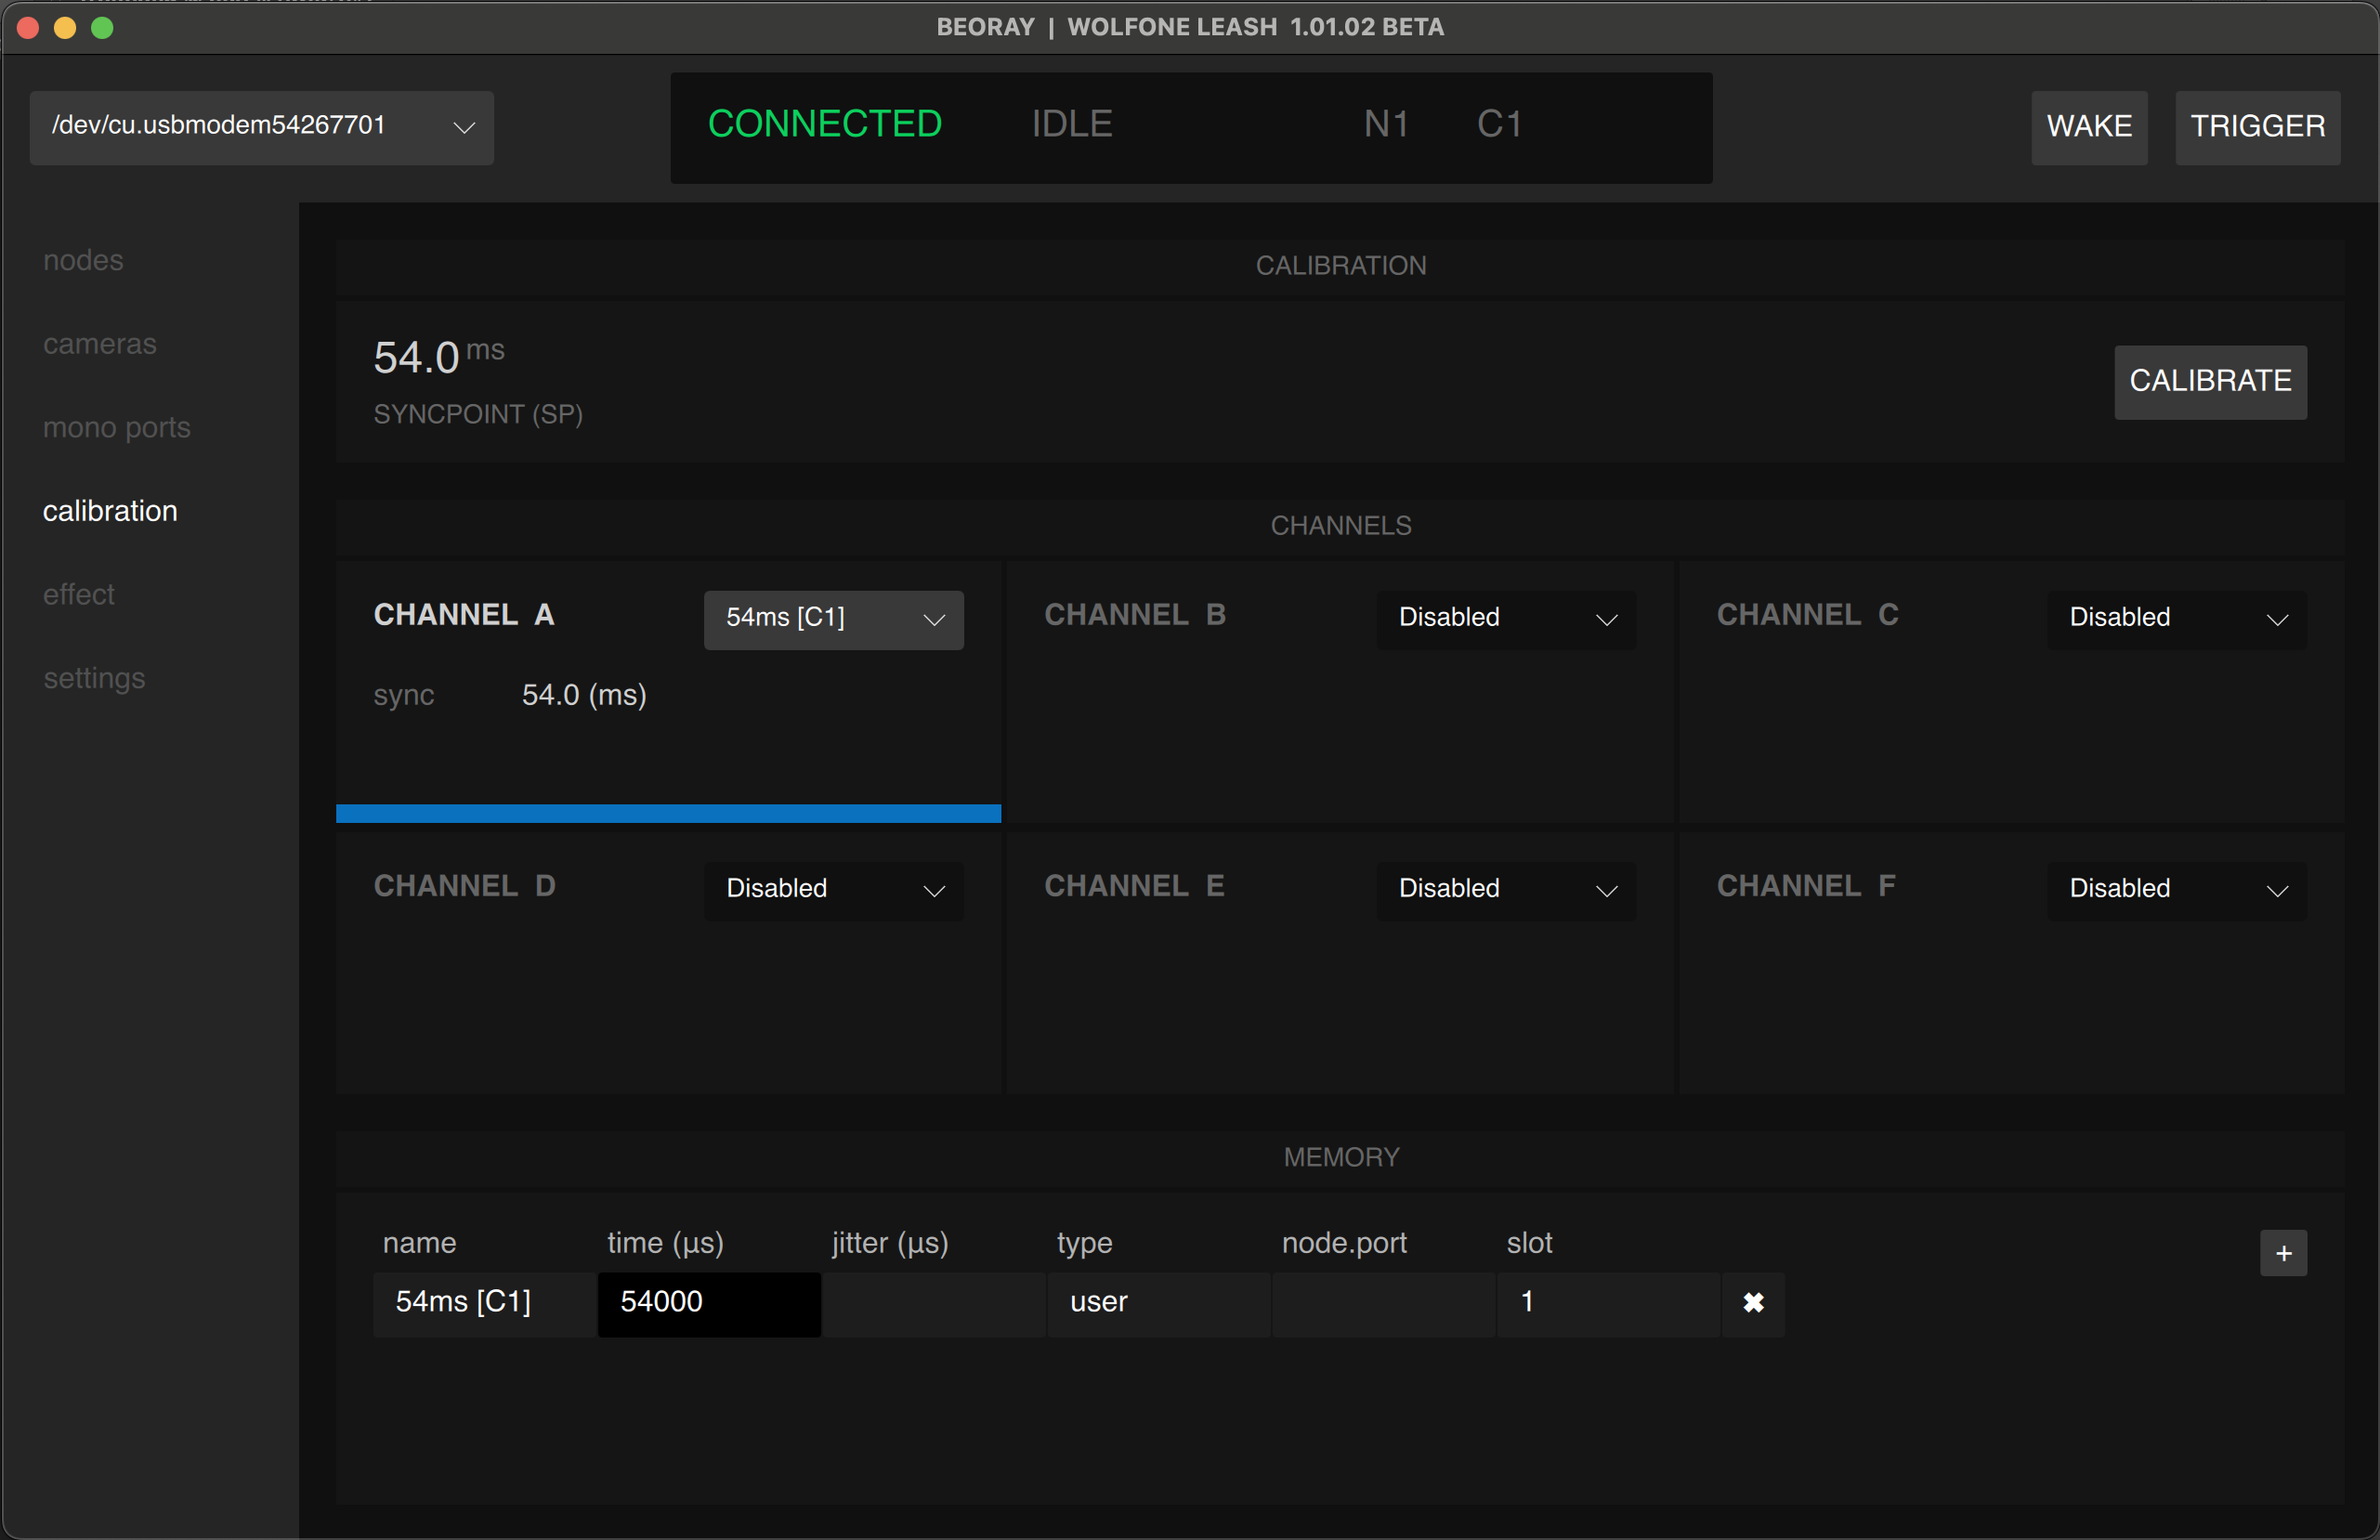
If calibration is successful, an entry will update or appear in MEMORY section at the bottom of the page. If a calibration for the camera port already exists the value will be replaced. The input led indicator light will turn blue.
-
If calibration is unsuccessful, check your connections and ensure the camera is ON and awake. In some cases, the camera will not generate a sync signal automatically and the output needs to be enabled. The camera must remain responsive for the entire duration of calibration.
-
After successful calibration
-
Once you have a satisfactory calibration value in memory, you may assign it to a Calibration channel. There are 6 channels to choose from (A,B,C,D,E,F) each with a unique color-blind safe color. Assign your new calibration value to a Channel.
-
Now that the Calibration value is assigned to a Channel you may apply that channel to camera ports and mono ports in in their respective tabs.
-
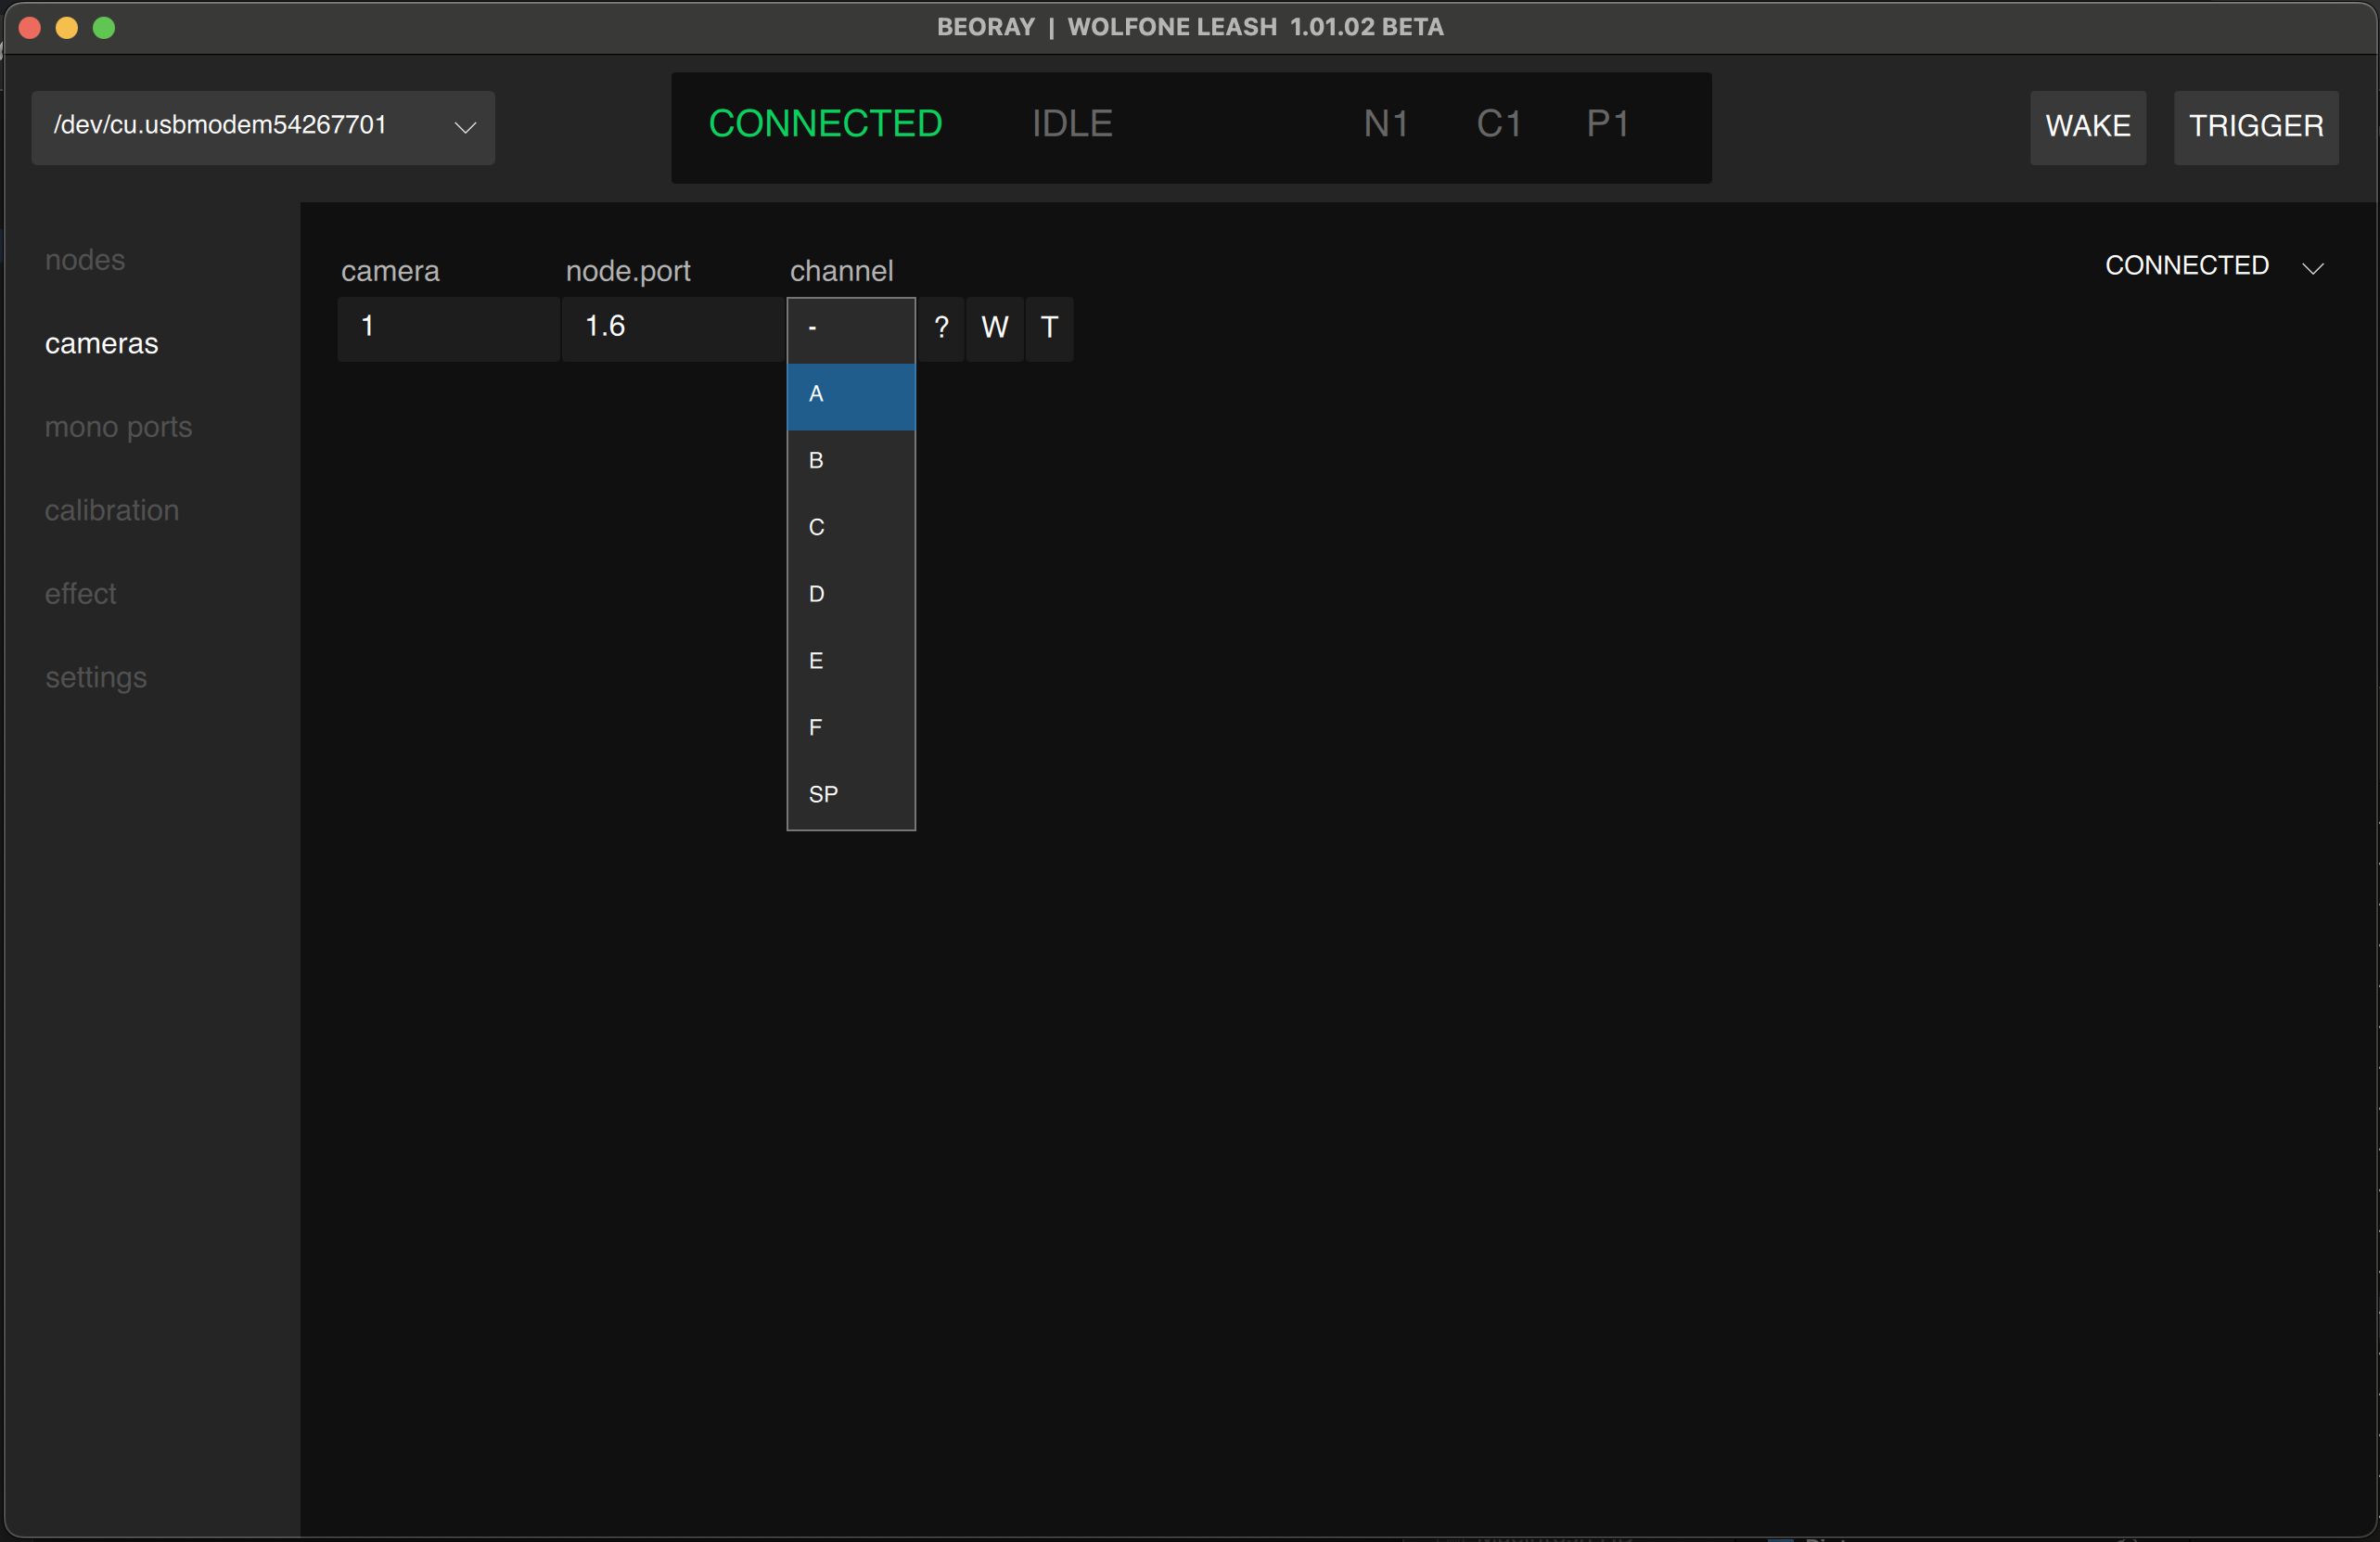
Applying calibration to camera ports
- Apply the associated calibration channel (A,B,C,D,E,F)
-
Applying calibration to mono ports
- Generally these ports are used for strobes. In this case apply the syncpoint calibration channel (SP). If you are triggering other devices, you may want to use a lettered channel. You can disable calibration by selecting the blank value (-)
Adding Custom calibrations
You may want to add a custom timing you know or previously measured. You may have run out of available trigger ports to save calibration values to. In these cases, you may add a custom calibration value by clicking the + button in the upper right corner of the MEMORY section.

FAQ
How do I interpret the calibration data?
- sync time measured in microseconds.
- jitter is measured in microseconds. For most use cases jitter should be less than 1000us (1 millisecond)
My jitter is too high
- In some cases the calibration routine measured an outlier signal which is skewing the data. Try calibrating again.
- A jitter value of less than 1ms is good enough for most use cases. If you want to improve the jitter value, try the following:
- Adjust the camera settings
- ensure PC software is not interfering with camera operation
- ensure the media (SD card) is fast enough for the camera
- try a different lens
- try a different camera body
- Some cameras are not capable of achieving tight sync. The camera calibration routine is not able to compensate for cameras with high jitter.
I successfully calibrated my camera, and the strobe is firing, but it is not syncing with the cameras.
- Ensure the strobe trigger cable is connected to one of the mono output ports.
- Ensure the mono output port is set to the (SP channel) and that all calibration channels are set correctly.
- In some cases lenses or camera settings can change the calibration of a camera. If you recently changed something, try running a new calibration routine.
- If your calibration jitter is too high (>1ms) you may not be able to achieve consistent sync. Check the "My jitter is too high" question for more information.
The strobe sync is inconsistent. Sometimes I capture black/dark frames. Sometimes I see a black bar on the edge of my image.
- Your shutter speed may be set too high. Even if your camera is rated to sync at 1/200th, you may be required to slow the shutter to 1/100th in a multi-camera configuration.
- If your calibration jitter is too high (>1ms) you may not be able to achieve consistent sync. Check the "My jitter is too high" question for more information.
- In some cases the calibration routine measured an outlier signal which is skewing the data. Try calibrating again.
- Some cameras need to be "waked" for a significant period before triggering to ensure sync. Try setting the "minimum wake time" value on the effect>config page to 500ms. Increment up to 1000ms if necessary. Anything beyond 1000ms typically indicates the issue lies elsewhere.
- Try disabling smart features such as Active D-lighting or face tracking.
- You should set the camera to MF focus, AF focus can change the timing of the camera.
Do I need a mono-to-mono 3.5mm cable for wireless strobe triggers?
- Yes, a stereo 3.5mm cable will not make proper contact in the input port.
After clicking calibration, nothing happens.
- First ensure the input port is blinking white. If not, remove the input port cable and reconnect.
- If the input port is blinking white and the camera is not triggered during the search routine, check the camera trigger cable. Ensure it is making good contact and triggering normally.
- The camera or wireless strobe triggers may be sleeping before the routine is started. Confirm they are active and try again.
After clicking calibration, the camera is only triggered once.
- The camera or wireless strobe triggers may be sleeping before the routine is started. Confirm they are active and try again.
- Check the PC sync (or 3.5mm mono-to-mono) cable is functional and making good contact.
- Ensure the camera (and any wireless strobe triggers) are generating a signal. If the strobe signal is not generated, or the signal hardware is incompatible, the node will not be able to calibrate the camera.
- If the camera is unable to trigger at rate of once per second without blocking, the node will not be able to calibrate the camera.
After clicking calibration, the camera triggers less than 10 times and the calibration routine fails.
- If the camera is unable to trigger at rate of once per second without blocking, the node will not be able to calibrate the camera.
- Slow SD cards can prevent the camera from triggering correctly.
- If the camera is connected to a PC, software running on the PC may prevent the camera from triggering correctly.
- In some cases the camera file format will prevent the camera from triggering correctly. This applies equally to JPEG or RAW. Try selecting a different file format and try again.
Calibration is successful but no new calibration data appears.
- The memory section is a list, try scrolling to see if the entry is hidden. you can also try changing a calibration channel drop down to see if a new entry has appeared.
- Calibration values for existing camera ports are replaced. Check to see if a calibration value was overwritten.